Now that you have installed BinMSGUI and the necessary dependencies, you can get to using the GUI / Jupyter Notebook.
Table of Contents
BinMSGUI - Jupyter Notebook User Guide
- Launch Jupyter Notebook: you will begin by launching Jupyter Notebook if you have not already done so. You can launch Jupyter Notebook from the command prompt/terminal with the use of the following commands:
cd [insert_notebook_directory] jupyter notebook- The first line changes directories to the insert_notebook_directory. This step is optional depending on where you cloned the BinMSGUI repository, or if you modified the Jupyter config file. This step simply makes it convenient to find the Notebook. Note: if you moved the binMSGUI_refactored Notebook, simply choose a directory that makes it easy to launch this Notebook.
- The second line simply launches Jupyter.
- Open the binMSGUI_refactored Notebook: the notebook that we will be using is called binMSGUI_refactored.ipynb, and is located in the .../BinMSGUI/BinMSGUI/jupyter directory.
- Modify the notebook_path value (optional): in the first cell you will see the following line of code:
notebook_path = os.path.dirname(os.path.abspath("__file__"))This code is used to localize the BinMSGUI code so that it can be imported later in this cell. If you have moved the binMSGUI_refactored Notebook somewhere other than the BinMSGUI/BinMSGUI/jupyter directory, then you will need to modify this value so that it points to the BinMSGUI/BinMSGUI/jupyter directory.
-
Run the Import Cell: Now we can run the first cell which contains the necessary imports for the notebook. Note: the shortcut to run a cell in Jupyter is is Shift+Enter.
- Choose Analysis Directory: we can proceed to determining which directory we want to analyze. You must modify the directory variable in the second cell to the directory that contains all your .bin/.set files that you want analyzed. An example is the following:
# directory that you want to analyze directory = r'C:\Users\username\Desktop\AnalysisDirectory' - Run the 2nd Cell: once you have chosen the appropriate directory, you can run the second cell. It should print a list of all the sessions contained within this directory.
- Modify Sorting Parameters: the third cell will contain quite a few different parameters used to sort/convert the data. Since the GUI and the Notebook contain the same variables I have discussed them all in a separate section (here). Ensure that the parameters are correct, then finish this step by running the third cell (containing all the parameters).
- Run the Analysis: the final cell will perform the analysis on each session within the chosen directory, you can simply run this last cell to perform the analysis.
BinMSGUI - GUI User Guide
- Launch the GUI: you will begin by launching the GUI using the following command:
If properly installed you should see the Main Window of BinMSGUI which should look something like the image provided below.python -m BinMSGUI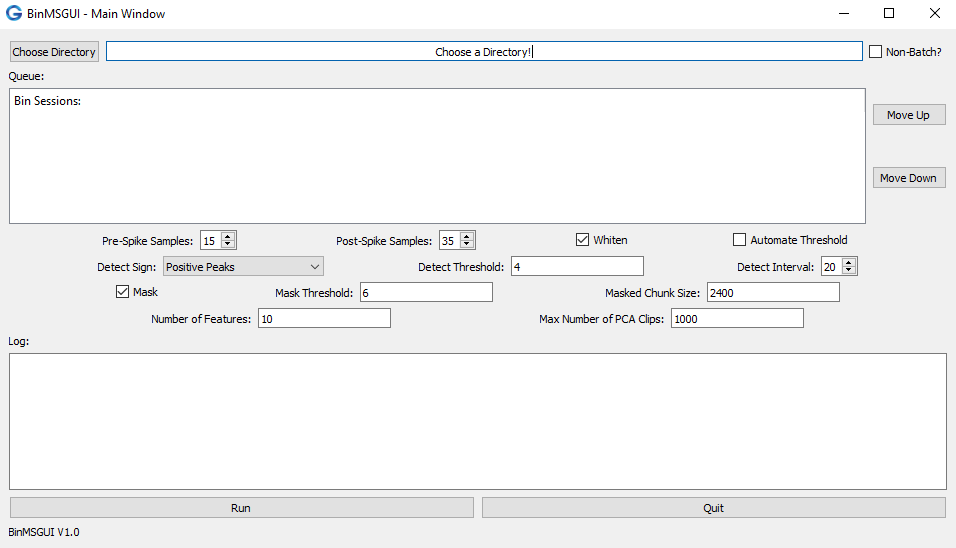
Fig 1. Main Window of the BinMSGUI
- Choose a Directory: Now you must choose a directory to analyze. There are two types of modes when choosing a directory. These modes are discussed below.
- Batch Mode: in the first mode BinMSGUI will analyze the .bin files within the sub-directories of your chosen directory. This occurs when the "Non-Batch?" checkbox is unchecked. See the example blow:
/Chosen_Directory /SubDirectory1 *SD1_Session1Files *SD1_Session2Files /SubDirectory2 *SD2_Session3Files *SD2_Session4Files /SubDirectory3 *SD3_Session1Files ChosenDirectory_Session5FilesIn the example above, the chosen directory (Chosen_Directory) contains 3 sub-directories (SubDirectory1, SubDirectory2, and SubDirectory3), as well as one session directly within the chosen directory (ChosenDirectory_Session5Files). The session files with the asterisks (*) next to them will be analyzed. Leaving the session directly within the chosen directory (ChosenDirectory_Session5Files), not to be analyzed. This process could be changed in the future if needed. When designing the GUI this seemed to be the best for our lab.
- Non-Batch Mode: since the Batch Mode skips all the sessions within the chosen directory, this mode will analyze those sessions (in the case that you only want to analyze sessions within one specific directory). An example is shown below:
/Chosen_Directory /SubDirectory1 SD1_Session1Files SD1_Session2Files /SubDirectory2 SD2_Session3Files SD2_Session4Files /SubDirectory3 SD3_Session1Files *ChosenDirectory_Session5FilesThis time you see the same structure as shown in the Batch Mode, except all the sessions within the sub-directories (SubDirectory1, SubDirectory2, and SubDirectory3) are skipped, and the only sessions chosen are those directly held within the chosen directory (Chosen_Directory), marked with an asterisk (*).
- Batch Mode: in the first mode BinMSGUI will analyze the .bin files within the sub-directories of your chosen directory. This occurs when the "Non-Batch?" checkbox is unchecked. See the example blow:
- Directory Chosen: when you have chosen an appropriate file, the Queue should be populated with a list of sub-directories and their respective .bin files that need analyzing, depicted in the example image below. Note: if the Queue has not been populated, it is likely that all the .bin files have been analyzed, or that you are missing one of the files (you need the .set file as well for the analysis).
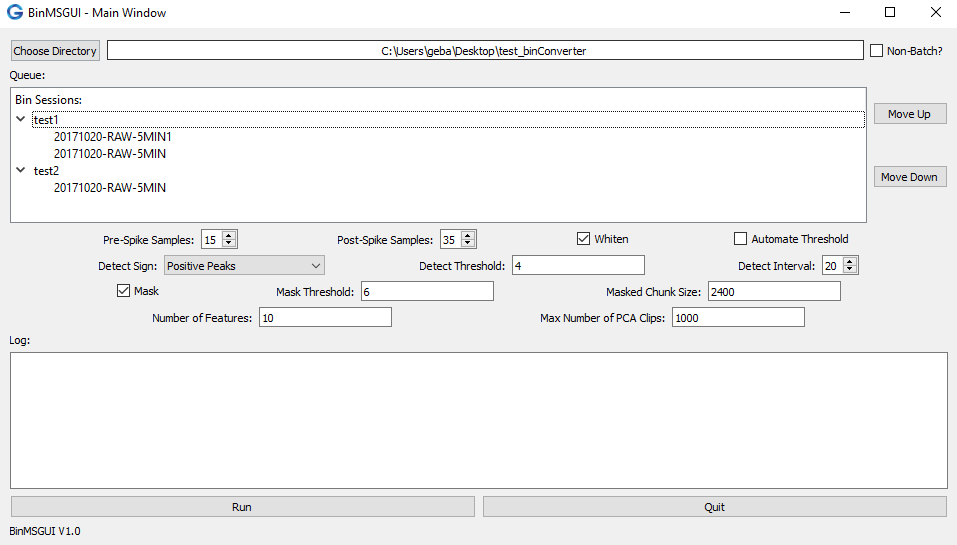
Fig 2. Visual representation of a properly chosen directory (in the Batch-Mode. In this case the test_binConverter directory contains two sub-directories, test1 which contains two sessions, and test2 which contains one session.
- Modify Sorting Parameters: below the Queue exists widgets that will allow you to modify the sorting parameters (pictured below). The parameters are discussed in detail here.
 Fig 3. Visual representation of the sorting parameter locations, shown by the red box.
 - Run the Conversion: now once you are satisfied with the sorting parameters, you can simply press the Run button located in the lower left of the BinMSGUI Main Window to proceed with the sorting/conversion!
BinMSGUI - Sorting Parameters
- Filtering Parameters: the .bin data that is being analyzed is already filtered based upon your settings while recording with the dacqUSB. Therefore, there is no further filtering that is required. I do have filtering parameters, but they don't do anything as of now. If you want me to make these settings usable, feel free to let me know. Right now they are just legacy.
- freq_min: the minimum frequency for a band-pass filter, the current default is 300 Hz which is the value that Tint uses.
- freq_max: the maximum frequency for a band-pass filter, the current default is 7000 Hz which is the value that Tint uses.
- notch_filter: again, the data is already filtered so a notch filter (of 50 Hz or 60 Hz) is not necessary as it should have already been done while recording the .bin data.
- Clip Parameters: when converting from the .bin data to the Tint format we need to know which index to place the peak at. Tint does this a little different, they place the 10th index where the threshold was crossed, but MountainSort provides the index with the peak value so we need to provide the number of samples to take before and after the peak when converting to Tint.
- pre_spike (Pre-Spike Samples): the number of samples before the peak index value of the spike.
- post_spike (Post-Spike Samples): the number of samples after the peak index value of the spike.
- clip_size: this parameter should always be 50 samples if you are converting to Tint (Tint requires 50 samples at all times). Since BinMSGUI does ultimately convert to Tint, I suggest leaving this parameter alone.
- Spatial Whitening: MountainSort will apply a spatial whitening filter to the input data as the MountainLab team suggests that this step is crucial for separating nearby clusters1. This filter will remove correlations among the channels, thus removing any common-mode signal.
- whiten: this will determine if you are whitening or not. To whiten, set the whiten variable to 'true', if you want to skip the whitening step set the whiten variable to 'false'. On the GUI version you either check to whiten, or uncheck to skip the whitening.
- Spike Detection Parameters: there are a few parameters that are specifically for thresholding and detection criteria for the spikes.
- detect_sign (Detect Sign): the algorithm uses the detect_sign value to determine if you want to detect positive peaks, negative peaks (troughs), or both. Setting the detect_sign to 1, -1, and 0 will allow for positive, negative, or both peaks respectively. On the GUI you will simply choose "Positive Peaks", "Negative Peaks", or "Positive Peaks and Negative Peaks".
- detect_interval (Detect Interval): the minimum number of samples between adjacent spikes, default by the algorithm is 10 samples.
- detect_threshold (Detect Threshold): the threshold for detecting events (spikes). If the data has been whitened then you have to keep in mind that the data has been normalized, so the units of detect_threshold would be in standard deviations. If you decided not to to whiten the data, then the units would be in bits. The .bin data is recorded in a 16-bit format, therefore the values that are recorded range from -32,768 to 32,767. These units might be foreign to some. The threshold in the .set file is a 16-bit number so you could always refer to that value. I could theoretically add a converter from uV to 16-bit values (based upon the gain values from the .set files) if that would help you decide on a threshold.
- automate_threshold (Automate Threshold): if you aren't whitening the data and want to use the threshold value from the .set file then you can set the automate_threshold value to True, and the code will search the .set file for the threshold automatically. If you set the automate_threshold to False, it will use whichever value the detect_threshold value is set to. In the GUI you will either check or uncheck the Automate Threshold checkbox.
- Artifact Masking Parameters: there is an artifact masking pre-processing step that will bin/chunk the data, and calculate the square root of the sum of the squares (RSS) for each bin. If the RSS value is above a provided threshold, then that bin (and the neighboring bins) will be set to zero.
- mask: set the mask value to True to include the artifact masking pre-processing step. Otherwise you can set the mask value to False to skip the artifact masking step.
- mask_threshold (Mask Threshold): the threshold value (units in standard deviations of the RSS values) used for the masking. When the RSS value of a bin exceeds this threshold value, that bin will determined to be an artifact. The default is 6 standard deviations.
- masked_chunk_size (Masked Chunk Size): this value will be the size of the bins/chunks that the data will be broken into (units is in samples). If you set the masked_chunk_size to None, it will set the value to the sampling frequency (Fs) divided by 20. MountainSort suggests a value of 2000 samples.
- mask_num_write_chunks: this parameter will determine how many chunks to simultaneously right when creating the masked output file. The default value in MountainSort is 150. Since this parameter isn't really that important I haven't provided it in the GUI. If you want to be able to modify this value feel free to let me know and I can add a widget for it on the Main Window.
- PCA Feature Parameters: you can determines how many PCA features to use during the ISO-SPLIT clustering process. The clustering is performed in n-dimensional features space.
- num_features (Number of Features): this value is the number of PCA features.
- max_num_clips_for_pca (Max Number of PCA Clips): only a certain percentage of the clips are used in the PCA, this value determines how many clips are used.
- Miscellaneous Parameters: these values are unimportant and really shouldn't be changed.
- self: the self variable is traditionally used in Object Oriented Programming to access the attributes and methods within the Class (primarily the main window of the GUI). If you are using the Jupyter Notebook this value should be set to None.
References
-
Chung, J. E., Magland, J. F., Barnett, A. H., Tolosa, V. M., Tooker, A. C., Lee, K. Y., ... Greengard, L. (2017). A Fully Automated Approachto Spike Sorting. Neuron, 95(6), 1381-1394.e6. https://doi.org/10.1016/j.neuron.2017.08.030